montero service manual

Hooniverse Asks: How do you determine which bolt or screw to use?

You’ve got that new (or lightly used) part you’ve been waiting on. It’s arrived, and you’re excited to install it. But it didn’t come with bolts. And the old part is missing bolts. The two bolts installed don’t appear to be the correct ones anyway. You want to do this right. You want the correct hardware here. So where do you look to figure out the correct size and type of bolts?

Do you turn to the various manuals offered for your vehicle? Perhaps the Internet is your salvation? Or maybe you just want to say screw it and wing the whole affair?

What is your preferred resource when it comes time to figure out which sort of bolt, clip, screw, nut, etc is supposed to be used?

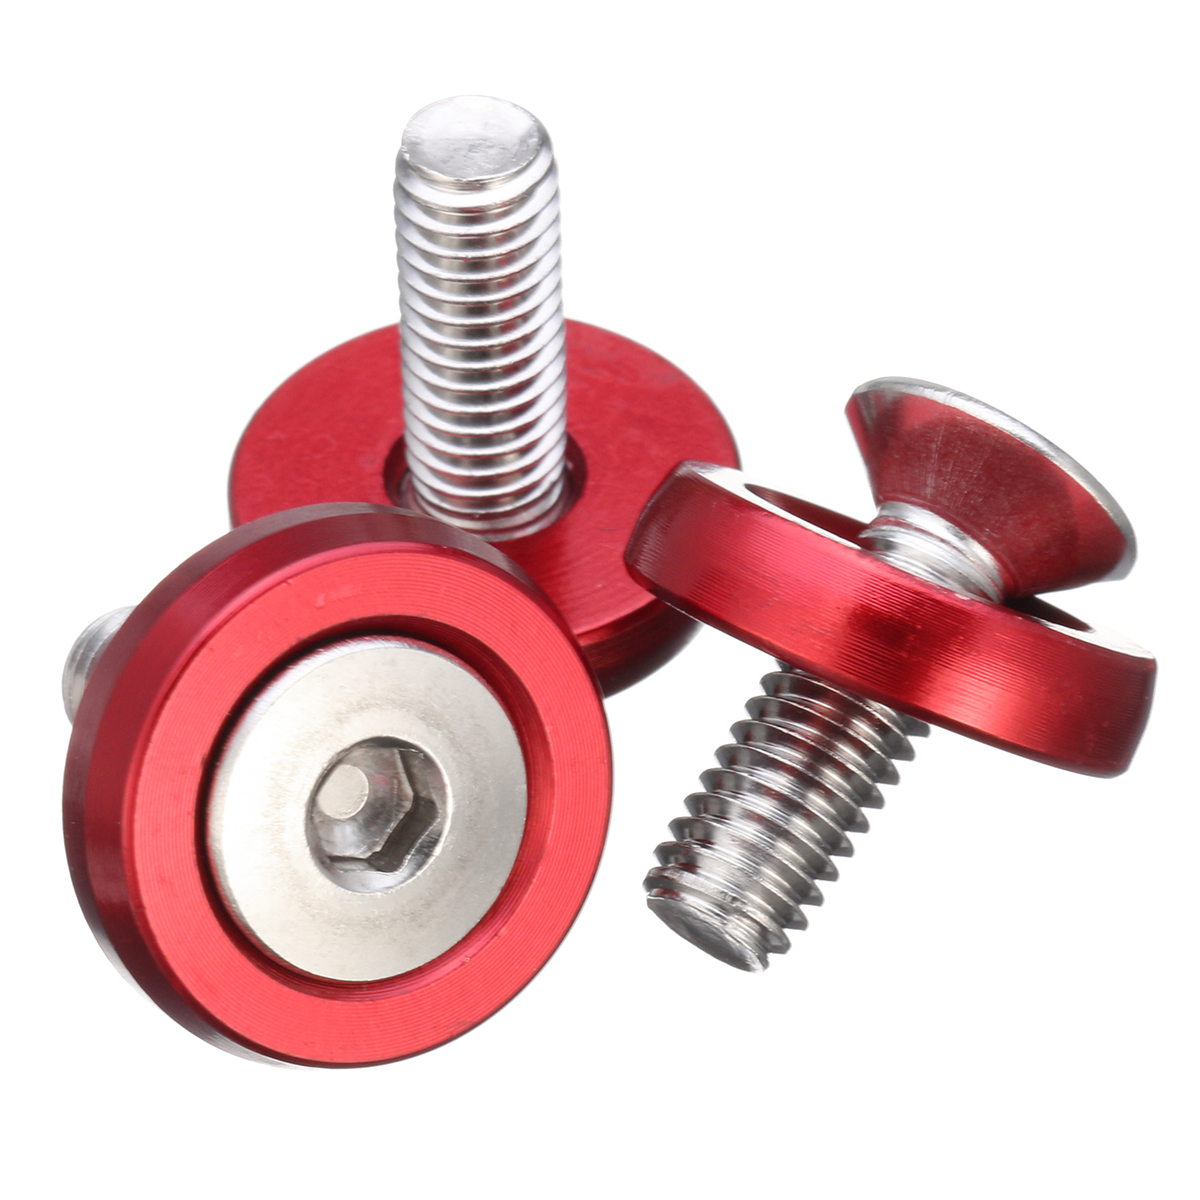
I received a clean center gauge cluster for my Montero. It has a working oil pressure and voltage meter, and the inclinometer works too. That last bit needs some more mineral oil though, but I’ll worry about that later. For now, I need to determine the correct mounting bits to make sure it’s properly installed in place.

Hemmings has a nice article covering the basics on identifying bolts. But for my own needs, I’m lucky to have two of the original screw still in place. I’ll grab those and bring them to the local hardware store, find a match, and head back home.

If I couldn’t do that, what would be the best course of action? How do you figure out which bolts and screw to use on your own vehicles?

Leave a Reply

Your email address will not be published. Required fields are marked *

The maximum upload file size: 64 MB. You can upload: image, audio, video. Links to YouTube, Facebook, Twitter and other services inserted in the comment text will be automatically embedded. Drop files here

24 responses to “Hooniverse Asks: How do you determine which bolt or screw to use?”

  1. smalleyxb122 Avatar
    smalleyxb122

    Drill it out, and install a 1/4-20.

  2. I_Borgward Avatar
    I_Borgward

    1) Search through my of Bucket-o-Volvobolts (seperate from the Ford bolts, household bolts and electronic crap bolts).
    2) Look for a similar bolt elsewhere on vehicle for a sample to aid search.
    3) Use bolt gauge to narrow things down
    4) Resist temptation to use “close enough” fastener found under workbench.
    5) Slowly conclude that among the thousands of fasteners in my collection, not a single one exists that will fit project.
    6) Admit defeat, go to hardware.

    https://uploads.disquscdn.com/images/deb83cd86b2f41ef548dc0ce4befdca67833ef30b153c7535ede962931b3fe35.jpg

    1. I_Borgward Avatar
      I_Borgward

      I am King Scavenger when it comes to automotive fasteners. I pick parts cars over like a Thanksgiving turkey for them, a habit that has saved my bacon more times than I can recall.

  3. P161911 Avatar
    P161911

    Thread gauge and calipers can work.

    1. 0A5599 Avatar
      0A5599

      Usually neck-and-neck with checking the big coffee can full of leftover hardware to see if anything fits.

      After that, find someone with a dealership parts book (often a dealership) and ask them to look up the part from an exploded diagram. The description should give you enough detail to use as a cross reference at the hardware store or MSC.

    2. anonymic Avatar
      anonymic

      This is on point. When depthing the hole with calipers, subtract 1 screw diameter or so from the length. Grade 5 for everything unless it spins or is safety related. Zinc or otherwise plated when used in aluminum.

  4. Zentropy Avatar
    Zentropy

    Unless they’re hardened bolts, I don’t worry much about it. But I make sure anything that holds the engine together is exactly to spec.

  5. smalleyxb122 Avatar
    smalleyxb122

    Drill it out, and install a 1/4-20.

  6. Peter Tanshanomi Avatar

    The specific application tells you what fastener it wasnts. It all depends on what materials you’re joining, the function of the parts, how it gets assembled, and how often it has to come apart.

    I compulsively buy fastener sets. I have everything from chrome-plated round-head screws to countersunk anodized socket-head bolts on hand.

    https://img.staticbg.com//images/oaupload/banggood/images/98/79/8f67b0e0-569c-4b31-84c2-6449eae5c935.JPG

    https://img.staticbg.com//images/oaupload/banggood/images/14/F8/5816016b-aac5-4244-8b66-5b3f767974ab.JPG

    https://www.picclickimg.com/00/s/NzMxWDkwNg==/z/xB4AAOSw-W5UtTtv/$/6-3-8x16x3-4-Powder-Coated-Gloss-Black-Stainless-Steel-_1.jpg

  7. mdharrell Avatar

    (1) Walk over to the parts car to verify that, yes, the corresponding bolt is already missing from it, too.

    (2) Search for the coffee can full of cherished heirloom fasteners that has been in the family since the 1950s.

    (3) Assuming success with (2), search through the aforementioned coffee can, fail to find anything useful, then move the can to a “safe place” so it’ll be easier to find next time. Just like last time.

    (4) Walk back to the parts car. Still missing.

    (5) Go buy a variety of bolts that span the range of best-guess fits. Check them. Repeat until successful.

    (6) Attempt to save the other recent purchases from (5) in a “safe place” other than the coffee can, which cannot now be located. Find a pile of other orphaned leftovers from previous projects while doing so, including at least two of the correct bolt. Start a new pile in a slightly different place.

    I sort of assumed this was standard practice for everyone.

    1. Jeff Glucker Avatar
      Jeff Glucker

      That happened yesterday. The exact size screws and washers I wanted were the ones not in stock…

    2. Scoutdude Avatar
      Scoutdude

      Sounds right to me.

  8. neight428 Avatar
    neight428

    The least realistic part of all of these car builder shows is when they are installing something and walk over to a cabinet larger than the entire local hardware store and just merrily pick what they need and bolt some $8,000 part on. They just condensed a month’s worth of project car angst into 10 seconds of fantasy.

    Overhaulin’ is to project cars as erm…adult films are to actual relationships.

  9. Batshitbox Avatar
    Batshitbox

    IH only used fine series (UNF) threads on my Scout 80s, and the nuts were welded in place, and the bolts all had the IH logo embossed in the top, so it was pretty easy to get the right fastener (or impossible, if you mis-placed it.) I think the fine series thing was either for vibration or so that in a pinch you could drill the nut out ever so much and run a coarse series tap through.

    Staying consistent with the surrounding fasteners in a similar application is the general rule. I find just keeping the driver size consistent is most important, as most bolt diameters have a specific head. Some socked heads betray this convention, and fine versus coarse do, but it’s just easier for the next time you take it apart if you need fewer tools. My skidplate was designed with 5 of one size bolt and 1 of the next size up and it drives me shithouse.

    Don’t mix stainless or aluminum with ferrous metal without using anti-sieze. In fact, stay the hell away from stainless and aluminum fasteners altogether, but use anti-sieze on everything anyway.

    On sheet metal, pop rivets never come loose, so use those. Good enough for Boeing and McDonnell -Douglas.

    1. onrails Avatar
      onrails

      In typical Italian fashion, the stock (STOCK!!!) rear suspension height adjuster on my Ducati was made of two steel threaded rods and a lovely machined aluminum hex piece that they threaded into. So the first humid day that it encountered (leaving the factory in Bologna, probably) it seized up solid. I desecrated the lightweight racing part with an all steel part with grease fittings.

    2. onrails Avatar
      onrails

      In typical Italian fashion, the stock (STOCK!!!) rear suspension height adjuster on my Ducati was made of two steel threaded rods and a lovely machined aluminum hex piece that they threaded into. So the first humid day that it encountered (leaving the factory in Bologna, probably) it seized up solid. I desecrated the lightweight racing part with an all steel part with grease fittings.

    3. 0A5599 Avatar
      0A5599

      I changed the water pump on the LTD recently, and had to remove (8) 9/16 nuts and (2) 5/16 nuts. I spent considerable effort avoiding mixing them up.

      When I was reinstalling everything, I noticed all the studs had the same size thread. Any of the nuts could have been used anywhere.

      1. Batshitbox Avatar
        Batshitbox

        Ford shaved some bucks by putting the giant lug nuts of the 1-ton vans on their 3/4-ton vans. While the larger nuts can be torqued to a higher value, they also barely fit in the holes in the rims of the E-250s. So the very thin-walled tip of the taper gets crushed onto the stud (because easy to over-torque.) They’re nearly impossible to remove, and strip out more studs than you can shake a stick at.

        So sometimes even the “factory correct” fastener is not the “real-world correct” fastener. The solution is to go to the next smaller lug nut, with it’s steeper taper it gets more metal into the rim before tightening up. Had to pay a bit of coin to have all of mine replaced, but now I can change a tire on the side of the road.

  10. SlowJoeCrow Avatar
    SlowJoeCrow

    If it’s not in the parts book or manual, thread gauge, calipers, a dig through my hardware box or a trip to Ace which has 4 aisles of Hilman hardware boxes and a free soda fountain.

  11. SlowJoeCrow Avatar
    SlowJoeCrow

    If it’s not in the parts book or manual, thread gauge, calipers, a dig through my hardware box or a trip to Ace which has 4 aisles of Hilman hardware boxes and a free soda fountain.

  12. Lokki Avatar
    Lokki

    1. mdharrell Avatar

      I actually thought the previous version of this comment was a pretty fair description.