
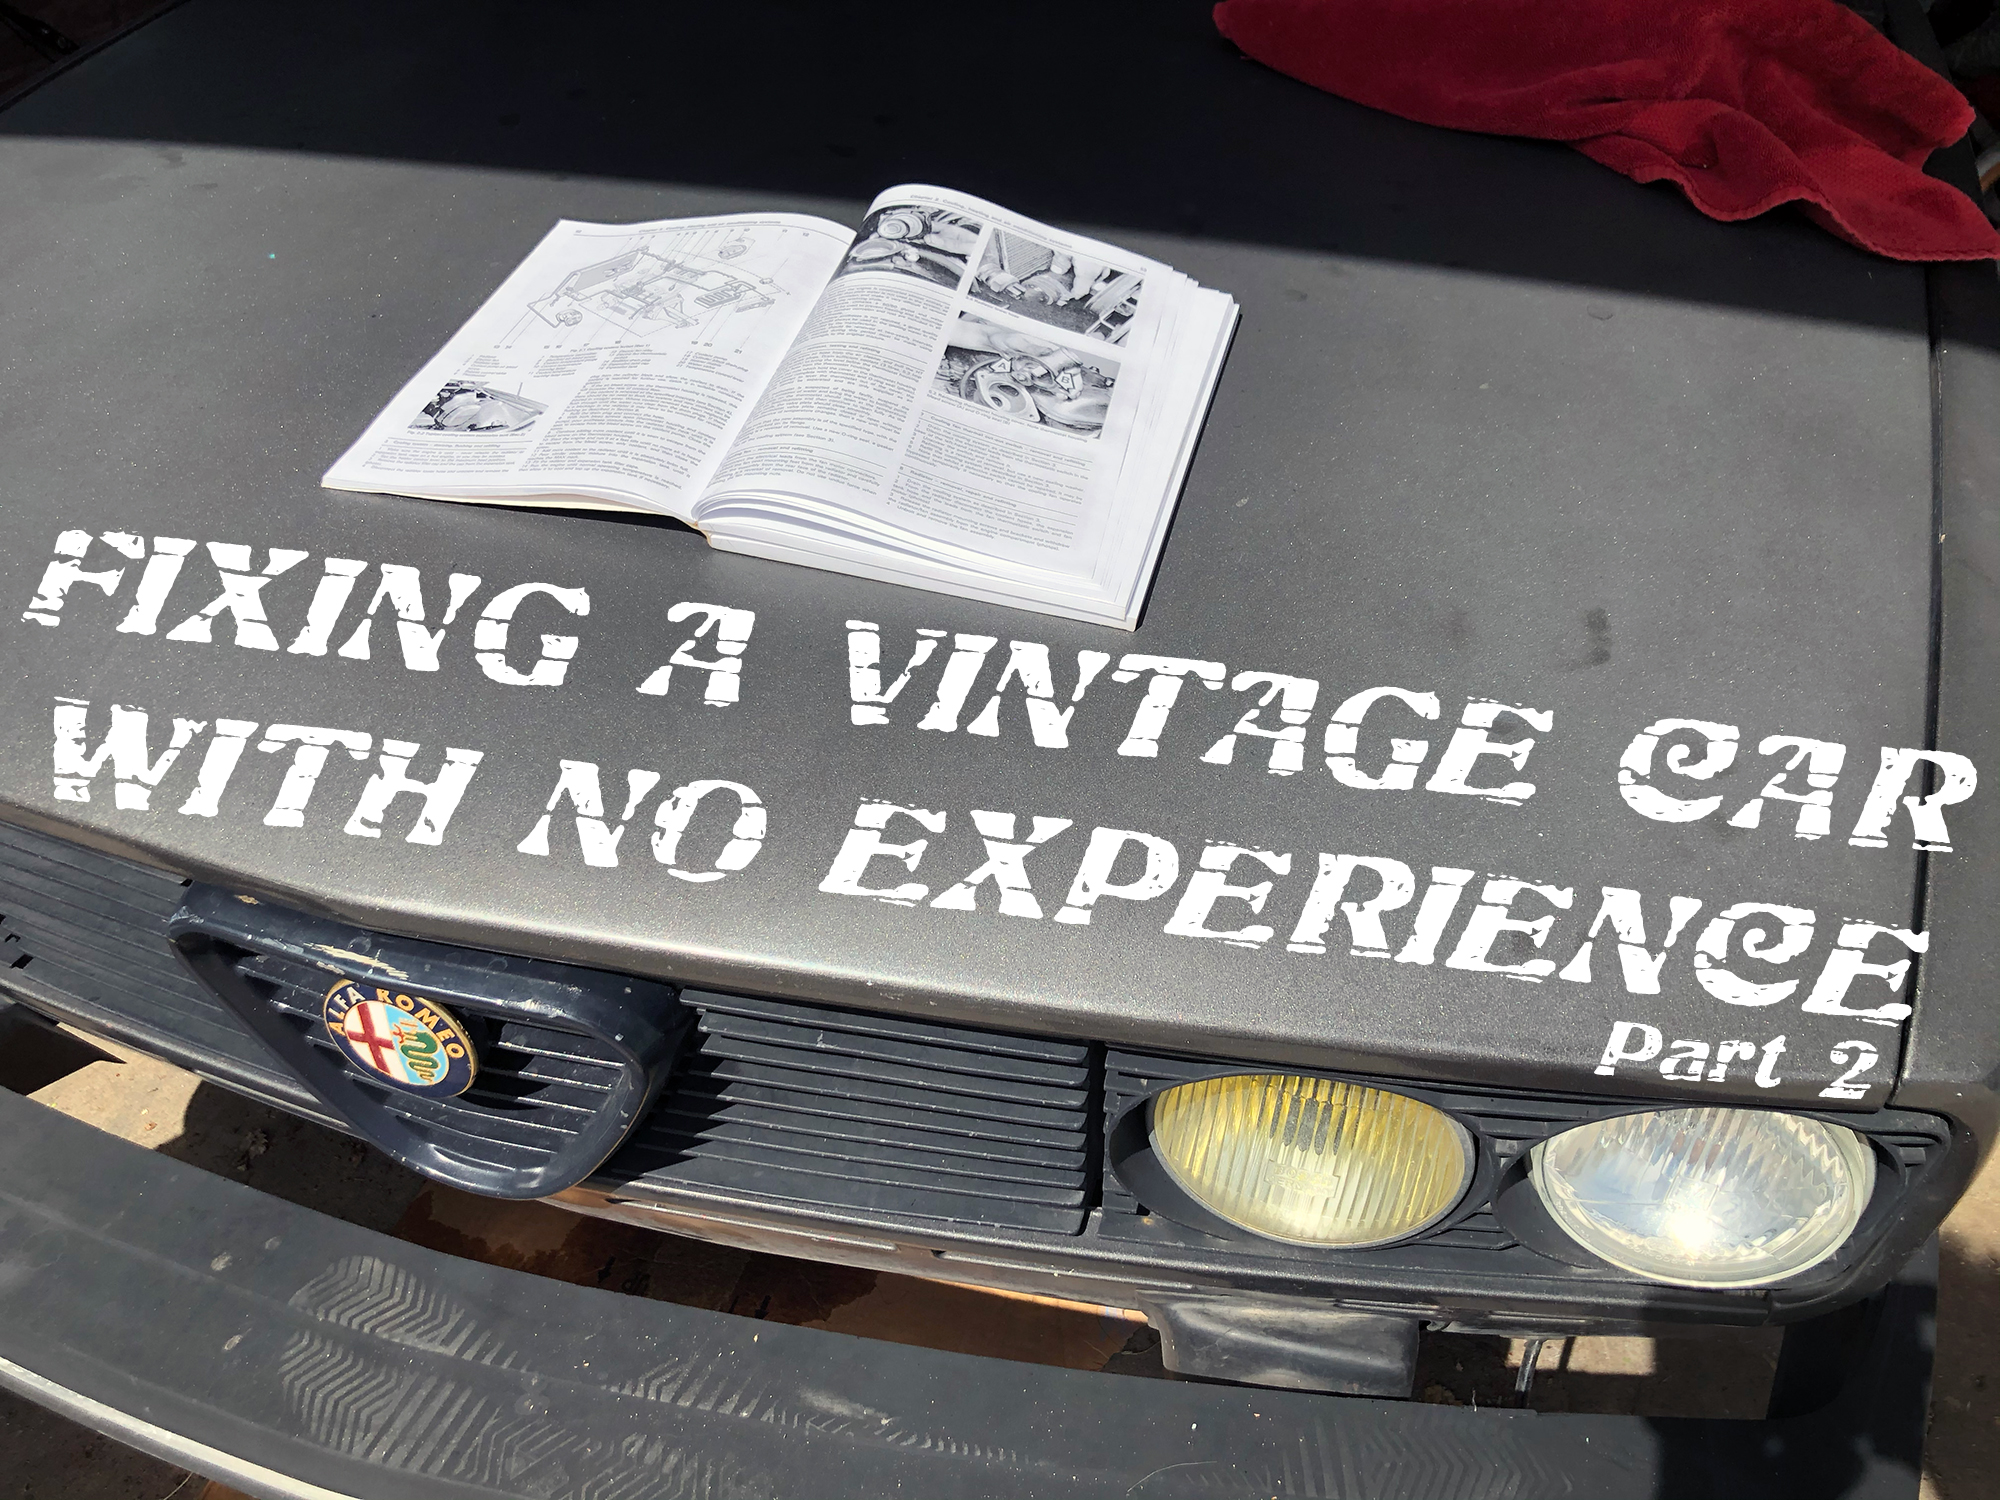
PART 2
MY GOD, WHAT HAVE I DONE?
As you may remember from Part I, the situation was this: the water pump on my 1979 Alfa Romeo “Alfetta” Sport Sedan failed. One option was to find a qualified mechanic/shop in the Denver area to replace the part. The other option was to do the repair myself.
I spoke with Benny about it. Benny knew my car better than anyone because Benny was the guy who I’d bought it from back in Los Angeles. There, he runs a shop called John’s Alfa Romance. He was also the guy who (prior to my purchase of it) had rebuilt the Sport Sedan with parts from various donor Alfas including a ‘71 Spider, an ‘87 Spider, and a 90s Milano. After I bought the car, he’d become my unflappable trusted mechanic. Benny told me unequivocally to definitely not attempt the repair myself. He explained that there was a critical step in the process that involved dealing with a crankshaft pulley, which was far beyond my abilities. (I had no abilities, to be clear.)
On the other hand, Car Twitter (an unofficial and vaguely defined group of Twitter users who love cars) told me that I should.
And so I did my own bit of reflection. Intellectually, I knew all of the reasons why it would be a terrible idea for me to try it. Chief among them: I had zero experience, and I had zero knowledge about how things like water pumps and car cooling systems worked. Hell, I barely had tools.
But there was some irrational, emotional part of me that felt like I needed to give it a shot. Some part of me that would feel like a coward, maybe even kind of a fake, if I just had it towed to an Alfa shop without having ever tried. So I disregarded Benny, and I listened to Twitter.
***

One of the difficulties with owning a vintage import like mine is that parts can be tough to come by. One of the few places in North America that carries a wide range of vintage and new Alfa Romeo parts is called Centerline. It’s where Benny orders his parts from. Incidentally, they happen to be located just outside of Denver.
I was delighted to find Centerline stocked a water pump that would fit my car. Keep in mind, shopping for my car can be confusing because even though it’s a ‘79, it’s got an ‘87 engine with a Bosch L-Jetronic fuel injection, which was never an option for the Sport Sedan.
I placed the order on Thursday, May 6 and it was scheduled to get to my house on Saturday, May 8, the day before Mother’s Day. I took stock of my tools, which was easy because aside from stuff for home repairs, I didn’t have any.
Now, what an intelligent person would have done was take a moment and assess the project. I knew I was attempting something far beyond my existing base of skill, knowledge, or experience. So perhaps if I was smart, I would have tried to give myself a good start by making a list of the various tools and other items I’d need. You know, make a checklist of sorts.
Instead, I took a more casual approach. I got a few things I thought might be useful and figured I’d just take it from there. After all, in addition to my copy of the Alfetta Haynes manual, I had a few different pairs of pliers and a Leatherman, so I’d probably be fine.

So on Friday, I headed down to the O’Reilly’s, conveniently located three blocks from my house, and picked up a metric socket wrench set (because I heard those are useful), some Permatex (for sealing the new pump onto the engine block), a drain pan (to catch whatever little coolant was left in the car when I took off the old pump), and a gallon of new coolant (for when I’d successfully installed the pump and reattached whatever else needed to be reattached).
I returned home with my haul, already feeling like a real-life mechanic.
***

Woke up on Saturday morning, gave my kids a nice big breakfast, and played with them for a while as I awaited the arrival of my new pump. After all, I couldn’t very well start without that. Around noon, my wife took my kids to the Denver Botanic Gardens to see the Spring blooms, and mere minutes later, the postman arrived with a box from Centerline.
I posted photos of the box on Twitter along with: “DEEP BREATHS. I can do this…”
“You got this. You have a Haynes, tools, and a taste for adventure,” Damian Solorzano replied to me. Damien frequently interacts with my Alfa tweets because he’s one of the few people who used to own a Sport Sedan.
I headed out to the garage, ready to get the job done.
***

Now, I’m not sure why I felt like I needed the part before I could start, because I am going to tell you right now that I did not actually touch the new part until many days later.
Naively (and inexplicably) optimistic, as well as utterly unaware of just what I was in for, I put on some music, popped the hood, and opened the Haynes. Step 1: “Drain the cooling system and disconnect the coolant hoses from the pump.”

Easy enough, I thought. I looked down into the engine bay. Boy, there were a lot of hoses. Seemed to me that some of them were going to be tough to access because of the electric fan that was bolted to the back of the radiator. I tried working around it, but it was impossible. This fan was clearly going to be a problem.
But, goddamnit, I’d just bought a socket wrench set and a drain pan. I wasn’t going to let a little improvisation deter me. In fact, I reasoned, taking a little initiative would be a confident first step. Hell, there was only one electrical connection and four bolts.
I took it off and set it aside. The old, metal fan with a wire hanging off, looked slightly misshapen. But mostly, it looked like a car part. A car part without a car.

I got a funny feeling. It wasn’t a good feeling. It was an “Uh oh, that part is supposed to be in my car, and now it’s leaning up against our boxes of Christmas decorations” feeling, and I hadn’t even gotten to the first step yet.
Perhaps this disoriented me because instead of consulting the Haynes manual on how to “Drain the cooling system” (which was clearly outlined in Section 3 of the same chapter), I decided to just start taking hoses off. Started with the lower radiator hose. Loosened the clamp. It was easy!
And then I pulled. But, man, those suckers are really on there. Like really on there. Pulled and pulled and pulled and then finally I twisted, and finally, it came loose.
Now, as I mentioned in the previous chapter of this story, there had been quite a lot of coolant that had leaked out of the car. So I didn’t figure there could be much left. But when the hose came loose, a gush of coolant issued forth that made me jump back as if a dam had just burst and I was in its path.
And then I realized that the drain pan wasn’t entirely beneath the car. A deluge of coolant rained down upon my garage floor, and so I got a hold of myself and rushed back at the car, kicked the pan under there, and watched as it somehow almost entirely filled with the bright green liquid.
From one hose.

In the Talking Heads song, “Once In A Lifetime,” David Byrne sings, “And you may say to yourself, ‘My God, what have I done?’” David Byrne must have had a premonition about me and my car when he wrote that song because that is precisely what I was saying to myself at that moment. It wasn’t just the sheer volume of liquid, but it was my sheer cluelessness as to just how much coolant a tiny little car like mine can hold. Why in the hell did I think I could do this?
Well, I’d already started. So I gathered my courage and pressed on.
Luckily, I had an old, mostly empty container of coolant. So I tried emptying the pan into that but sloshed at least half of it out onto the already coolant-soaked garage floor. Afterward, I noticed that the pan had a pouring spout molded into one corner. It was the opposite corner I’d poured from. Really would have been great to have noticed that beforehand.
Drenched in coolant, I picked another hose (at random) and removed that, and watched as yet even more coolant came gushing out. I’d say you can’t believe how much coolant a car can hold, but since you’re reading this on Hooniverse, you probably do realize that.
You are smarter than me. But at this point, you probably realize that, too.
***
With every hose that was removed, more coolant spilled out, the bigger the mess I made, and the more certain I became that maybe I hadn’t done something correctly. So, I stepped over to my Haynes and re-read step 1: “Drain the cooling system.”
Perhaps, I thought, I should read how they want me to do that. So, I turned back a few pages and consulted the appropriate set of instructions. Step 4 of that procedure includes: “remove the plug from the cylinder block and allow the coolant to drain.”
I consulted with the diagram at the beginning of the chapter to try to find the cylinder block plug. And then I stared at my engine for a long while. The diagram made it look so clear. But when I looked at the actual real engine, it seemed to only bear a passing resemblance to what was on the same page.
Back and forth, I looked. Back and forth, back and forth, diagram, car, diagram, car. What the hell bolt was the plug? After a while, I thought I maybe had it narrowed down. That was good. What wasn’t good was that it seemed a little hard to access using my socket set. Also, I couldn’t imagine that there could be that much more coolant left in the car. Surely, I could skip this step.
But my self-confidence was bruised already. I needed some encouragement. I took to Twitter: “Car Twitter: is it so bad if I don’t drain every last drop of coolant from my system before replacing the H2O pump?”
Among the replies:
Charles Brand: “Not if it’s relatively clean. But most pumps are low enough that removing them pretty much drains the system anyway…”
Lewin “TK” Day: “Really shouldn’t be much of a problem.”
Pats Curtins: “You should be fine!”
Jeff Batterton: “No big deal. Probably impossible anyway.”
Relieved and feeling confident that I could move ahead from here, I checked Haynes to see what the next step was. It read: “Release alternator mounting and adjuster link bolts, also the nut at the coolant pump end of the link, and push the alternator in towards the engine. Slip the drive belt from the pulleys.”
First of all, that didn’t sound like a single step. That sounded like about six steps. Secondly, I didn’t know what any of those things were.
***

OK, alternator. Find the alternator, I told myself. I stared into the front end of my car and at the engine, regarding the various things bolted and connected to it by belts. I knew, in broad terms, what an alternator does (generates electricity, which is fed to the car when it’s on, and also back to the battery in order to charge it). But I hadn’t a clue as to what an alternator looked like. And that seemed like a pretty important thing to figure out if I was going to release its “mounting and adjuster link bolt” before “[pushing it] in towards the engine.”
I’ve made no pretense by now about my level of automotive savviness. I’ve not tried to convince you that I knew what the hell I was doing. So I’ll just go ahead and admit to you right now that I hadn’t the faintest of clues of what my alternator was supposed to look like. So, still drenched in coolant and a thin layer of nervous sweat, I Googled “alternator” to try to see what it might look like. That didn’t really help because there are so many different kinds. So, then I consulted a different section of the Haynes manual to get a better idea of what I might be looking for.
That gave me a little more insight, and so then I felt somewhat optimistic that the alternator was the thing to the right of the water pump, as I was standing in front of it.
But the next problem was the “mounting bolt.” There seemed to be nuts and bolts and studs all over the place, and I hadn’t any idea which one was the “mounting bolt.” The Haynes manual includes photos of various steps, but none of this one. So then I turned back to its entry on the alternator, and found a nice clear shot of the mounting bolt already removed, and also unobstructed by the belt and grime. But it was enough for me to locate it with the help of a flashlight.
And what happened next was indicative of basically every step of the entire project: first, it read easy and simple enough on paper; second, it was harder to figure out in real life; third, once I was sure of what to do, doing it was far more difficult than I ever imagined it would be, particularly because, at no point, does the manual ever mention anything like “once you locate the bolt, you’ll find it refuses to move.” [Editor’s Note: LOL, inject every part of this story into my veins – we’ve all lived most of this.]
That was exactly the situation with this mounting bolt. I put all my strength into trying to loosen it, but it wouldn’t budge. And if that wouldn’t budge, then the alternator itself wouldn’t budge. And if the alternator wouldn’t budge, the belt connecting it to the water pump would budge either.
So there I was, standing there with the electric fan out of the car, all of the hoses disconnected, coolant still dripping from each one, and me going to battle on a single bolt that wasn’t even a component of the part I was trying to do the actual work on. Frustration and fear washed over me. My God, what have I done?
“Alternator mounting bolt is stuck and the more I take the car apart, the closer I feel I am to an anxiety attack,” I tweeted.
And then I went back at it for another 20 minutes before tweeting, “I DONT WANNA TAKE OFF THE STUPID ALTERNATOR,” which was true but also inaccurate in that I did not technically need to “take off” the fucking thing—just loosen it.
“Have any penetrator? Spray it and walk away for a couple of hours…” Jeff replied.
Indeed, I replied that I had some PB Blaster, and I’d given it a good soak. I also supplied photos. Car Twitter sympathized: “Ah, crap, I see.” Jeff tweeted, “Lousy access, too.”
Brian DuBois chimed in, “Aww man it’s always lousy access.”
And then I got an idea: leverage.

I looked around my garage and found some old aluminum curtain rods. Slipped one of those over the socket wrench and gave it a go. Still didn’t budge. So I hit it with more PB Blaster and went at it some more. More than an hour after I started and still using the curtain rod trick, I finally felt the bolt give way. I announced my victory on Twitter, and Car Twitter rejoiced in my ability to loosen a bolt.
At this point, it was already three o’clock, and all I’d managed to do was half of the second step. But I loosened the mounting bolt, and then I took off the adjuster link, and sure enough, the alternator pivoted up towards the engine, which was enough to slacken the belt for its removal.
I had completed Step 2.
***
The next step, which was Step 3, was the absolute easiest. It read: “Disconnect the tachometer drive cable from the coolant pump if so equipped (certain early models).” Mine was not so equipped.
***

Step 4 in the Haynes manual read: “The crankshaft pulley/damper must be removed before the coolant pump can be withdrawn.” (Here, I could hear Benny’s voice telling me how I wouldn’t be able to do the job on my own because of something to do with the crankshaft.)
I tweeted a photo of the coolant pump and alternator now unencumbered by hoses or belts: “Now on to the crankshaft pulley dampener *sob*”
“Ugh,” Jeff wrote me back, “You’re on the home stretch now though.”
Except I wasn’t in the home stretch. Not even close. For one thing, what the hell was a “crankshaft pulley/dampener”? I had no idea whatsoever. So, I looked through the manual. Couldn’t find anything about a dampener. Just a pulley. I tweeted out some photos. At one point, I thought maybe the pulley/dampener was simply this small bit of pointy metal nearby one of the pulleys. (It was not, and I was lucky I didn’t remove it, as it was a timing point for the engine, which would have to be reattached to the new coolant pump.)
Car Twitter was not nearly as confused as me, but they were kind about it.
A user who goes by the name Bigly Unwitty replied, “Pulley ‘dampener.’ So it’s not a tensioner. Does that mean the pulley itself mounted on the end of the crank is designed to dampen?”
“It’s just the pulley below the water pump, right?” Jeff asked me (probably rhetorically).
I was truly over my head and feeling desperate, I thought to myself: What if I just skip this step? Maybe I can just take the stupid water pump off without worrying about this…
I wasn’t the only one to wonder this. “Time out. [You’re] swapping the water pump right?” Unwitty wrote to me.
Jeff asked, “Visually, what’s in the way of removing the pump?”
I looked at the old pump. It’s mounted onto a bunch of studs, which protrude from the block of the engine. The pump is then secured onto those studs by washers and nuts. “TBD…” I tweeted hopefully, “trying to access some of these nuts…”
But as I examined the pump, it was clear: some of those studs were directly behind the pulley below the water pump. There was no way to even touch the nuts or physically pull the pump off with that pulley in the way. The pulley was blocking it in. And that must have meant that Jeff and Unwitty were correct: the “crankshaft pulley/dampener” was the pulley itself.
I went back to the Haynes manual, where Step 4 was given more detail: “To [remove the crankshaft pulley/dampener], either remove the starter motor and jam the flywheel starter ring gear with a large screwdriver or cold chisel, or select a gear and apply the handbrake fully in order to prevent the crankshaft rotating as the nut is unscrewed.”
If you would have offered me a million dollars on the spot to correctly identify where the starter motor even was on that late Saturday afternoon, I would not be a penny richer because I hadn’t a clue. In fact, as I would later learn, my best guess about which thing was the starter turned out to be the A/C.
Add to that, I had no idea where or what a flywheel starter ring gear was. So jamming any sort of screwdriver or chisel into it was out of the question.
So I put the car in gear and pulled the handbrake. I went ahead and chocked my wheels, too, just to be safe.
But, you see the pulley is located pretty low. Just above the oil pan. Just above the bumper line. When you consider that and how the nut is threaded onto the hub, which is deeply recessed into the center of the pulley, you sort of have to work blind. So that’s what I was doing as I was going through all my sockets, trying to find one to fit the nut. But no matter what I tried, nothing seemed to gain purchase on the nut.
So, I fished my phone down there into the space between the radiator and the hub and took some flash photos. Looked at the resulting images and quickly realized just how big that nut was. I did a Google search for Alfa Spider Crankshaft Pulley Nut and was pleasantly surprised that I found an AlfaBB thread that contained the exact answer for the size: 36mm. Not so pleasant was the many, many posts and threads where people described their struggles with trying to remove the nut.

One person indicated it had been a year and he still hadn’t figured it out. Hardly encouraging. How long would it take me, I wondered. Two years? Five?
I posted my findings. Brain DuBois replied: “Time for the big socket you will only use once…”
I put my phone away and made what would become a regular pilgrimage to the O’Reilly a few blocks away so I could buy the socket. It would turn out to be the correct size.
But the worst—the worst was yet to come.
Oh, I sympathize so massively. Always been strangely incompetent when it comes to mechanics. I seem to learn this kind of stuff more slowly than most other things, and I’ve lacked access all my life. With a tendency toward owning very rare cars, YouTube is a bit hit and miss, but can help tremendously.
Still, nothing can replace a solid layer of basic knowledge and understanding. Almost 15 years ago, I tried to prepare a new hatch for my then beloved 1971 Volvo 145. The Haynes manual said ‘remove the lock’. No word on how. Looked everywhere, couldn’t figure it out. A friend came over, put his fingernail on a spot, drew out some kind of disk, and off it went, the damn lock. I never knew you could mount stuff like that.
With my current “in-over-my-head”-car, I was to swap spark plugs. My mechanic intervened, knowing me too well and also aware of that he will fix my mistakes. There are success stories, though, “success” means I get it done. Nothing pretty, smooth or quick about it…looking forward to the next installment here.
” my then beloved 1971 Volvo 145″
Would that be your now detested 1971 Volvo 145?
It’s gone, gone for good, I’m afraid…well, somebody might still hang on to it, with a well-used Haynes to follow.
Glad you can relate! You and I should have a beer and see if we don’t manage to spill it all over ourselves.
Beer spilling skills > Hold my beer skills. 11/10!
Critical acclaim for “Fixing My Weird Vintage Car with a Haynes Manual, Car Twitter, and No Skills or Experience”
Wacky and irreverent! -USAToday
A delightful romp! – Buzz Aldrin
Truly a bildungsroman for the post-industrial era. Follow our guileless ingenue as he navigates an odyssey of knucklebusting, along the way advised by colorful digital characters who may or may not want to see him succeed.” – Bloviatorbox
“It’s only an Alfetta Sport Coupe, thank god!” – J. Leno
This cracked me up. And I am totally using those quotes in my portfolio. I mean, I CAN ONLY ASSUME THEY’RE LEGIT.
David, who cares if you’re inexperienced turning wrenches when you are so skilled in mining the setbacks for such great storytelling.
And speaking of turning wrenches, that 36mm socket is available a that same O’Reilly as a loaner tool. Well, the website says it is, even though when you ask for it, the person behind the counter will probably tell you the last person who borrowed it never returned it.
Thank you so much. Going it, I had a very good feeling that, at least, it’d make good fodder for an essay! That O’Reilly told me they didn’t have the 36mm or the…D’OH no spoilers…Part III on Friday!
David this read is fantastic! (and I’m sure we’ve ALL been there before – totally unsure of what to do, in a giant mess way over our heads, and well past the point of no return.)
I can’t wait for the next installment
(oh, and the very spartan use of words in a Haynes manual is why I much prefer Chiltons – still not perfect, but the steps seem to be a little more in-depth)
Thank you so much, and I absolutely LOVE your name and your avatar. Do you have a GTX?
I do have a GTX.
It’s a real 1968 RS23L8… car, 440/4 speed. I’ve owned it for 27 years now, and it still looks like the rode hard and put away wet lump as when I bought it, except now she’s rocking brand new rims and tires. I’ll never sell it. Under the old system I’ve posted a couple of blurry pictures that make it look better than it is.
Oh man, that sounds absolutely awesome. Would love to see some clear pictures that show the wear/age. I appreciate that more than the things that just rolled out of the Gas Brothers Garage or whatever the hell.
The whole “barrel in half-prepared and then find out just how much needs to be done” sounds like just about everything I’ve tried to do to any of my cars, to the point the smallest fixes feel like glorious achievements. I’m at least lucky on having a newer car that,for now, stuck bolts aren’t a big problem. Trying to swap my springs in a subway parking lot was still not a great idea though (rears were easy, had to cave and get a shop to do the fronts).
I wonder by the comments if there will be more than just a puller required to remove the pulley dampener, or if it’s the clutch slipping slightly… Hopefully it wasn’t too traumatic
OH JUST YOU WAIT. (Final part is published today, Friday.)
I look forward to the next installment of your epic tale. Some of this feels like my first deep dive int a car engine in my twenties working on a VW Scirocco as broken parts made a supposedly simple job far more complex. Even after decades of occasional wrenching swapping cylinder heads on a 5.4 Triton had me hanging my head in despair on occasions last summer.
I love Sciroccos, but they are one of those cars I have heard so many wrenching horror stories about. And yet…I bet they are worth it!
This is exactly how many “car guys” turn into “gear heads” (a distinction I just made up between people who like cars and people who can actually work on them). It’s some combination of:
– I don’t know who to take it to
– I’m tired of spending money with my mechanic and
– How hard can it be?
You tackle a simple job, it’s harder than it looked and you get it done anyway. Then, like a woman who eventually forgets the severity of the pain of childbirth, you remember only the satisfaction of completion and you have the confidence to try bigger and harder jobs. Welcome to the world of frustration, skinned knuckles, dirty fingernails and satisfaction of a job well done, or at least done.
One thing I’d recommend is finding an Alfa forum instead of general car Twitter. That’s where the Alfa experts hang out and they’ll be able to give you targeted advice. You may find a step by step write up of exactly what you are doing. Forums have been invaluable to me in so many projects.
Most recently it was in diagnosing why my new rear brakes on my Tundra had made braking performance worse, dangerously so. Turns out the adjustment of the drums was critical and adjusting them was best done with the parking brake and mine wasn’t functional. I’ve done dozens of brake jobs and never come across this problem before. I wouldn’t have fixed it without what I learned on the Tundra forum.