 Transporting bicycles isn’t easy. If your vehicle is big and functional enough, it’s possible throw a bike or two inside, with the front wheels removed. The roof is a good place but placing bicycles on a larger vehicle may be challenging for some. Also, once on the roof bikes cause significant drag, make a lot of noise, and kill the fuel economy.
Transporting bikes on a rack mounted behind the vehicle seems like it makes the most sense. Here, the bikes are easier to load and don’t create drag. Still, it’s not a perfect solution as the rack extends the length of your vehicle, may block visibility, and now your trunk is inaccessible. Unlike a roof rack, for full vehicle functionality the rear racks need to be removed when the bikes are off.
With the FullSwing, Yakima tries to make living with a hitch-mounted rack easier. This is a large unit designed to accommodate four bicycles and also swing out of the way even with bikes on it. Now you’re allowed access to the hatch or the tailgate of the vehicle.
Can this be the perfect solution for bike transport?
Installation:
The box with the FullSwing is rather large and heavy. It clocks in at around sixty pounds. Two large parts arrive ready for your assembly-time sweat; the hitch piece and the mast piece. There’s also a bag with ZipStrips to secure your bikes to the rack, a wrench (which also serves as a bottle opener!), keys, hardware, and instructions.
The hitch gets installed first, and it’s very simple to do so. Slide it into the hitch receiver, press in the pin button, and click it into place. There is an anchor lock that may need to be adjusted first. There is no bolt to pass through the receiver and rack, which may worry some, but this pin is very solid.
Attaching the mast piece is a bit more tricky, however, despite the above video making it look easy. This is a heavy piece that needs to be held vertically and aligned at the same time. Once aligned, a large bolt needs to be put through and into the hitch piece. Then you have to slip on a washer and nut, and finally eye-ball tighten it to 10 ft-lbs. I did this part by myself but I did break a sweat on a hot July day and I probably over-tightened that bolt.


Your rack is now attached to the vehicle and it can swivel to get out of the way of the hatch freely. To secure the swinging part, which must be done anytime the rack is swung away, the mast piece must be aligned with the hitch piece. Spin the large handle to 32 ft-lbs or just really tight so that nothing moves. For testing purposes I shook the whole rack and there was some give, as there should be for shock absorption, but it was otherwise solid.
Twist the red knob on the bottom of the rack to secure the whole rack to the vehicle and lock it with the supplied key. The lock uses the anchor inside the hitch, which is a clean and also very clever design. At this point the installation of the rack is completed. Flip up the bike support bars with a pull of the red lever and start loading your bikes.
Loading the bikes:

Yakima says that the heaviest bikes should go in first but real life is a little different. Bikes come in many shapes and sizes. Therefore even and balanced loading is not always an option. That was the case for our four bikes which I installed in the following order:
- I chose to put the biggest bike on first, my own Stumpjumper, which is a rather light bike due to its fancy aluminum frame. It fit perfectly with its large top tube over the two bars. If there was a problem is that it looked skewed due to the top-tube being angled.
- I then chose my daughter’s bike. It was heavier than my wife’s bike but due to its small size it lacks a typical frame opening. I therefore rested its bottom-tube on top of the load bars and secured it from the top. With it being sandwiched between other bikes, I had confidence that it will make the trip just fine.
- I chose my son’s trail-a-bike next for the same reason – it wasn’t going to fit perfectly and it was too big to fit inside. I managed to get one of the rack loading bars through its awkward frame. I secured the long end of it from the top, over the bar. I used a bungee cord, too, but wasn’t really needed. It wasn’t going anywhere.
- Much to her chagrin, I installed my wife’s bike last. I did that because it was the lightest and because it fit perfectly, if angled a bit like my own bike, over the load bars.

Both load bars have groves on top upon which to rest bike frames. Under each load bar are four sliding mounts. Two opposing mounts on each side, one designed to grab the top-tube of a bike and another to grab the seat-post or bottom-tube and top-tube. To secure the bikes to these mounts Yakima provides what they call ZipStrips.
Each plastic ZipStrip is a large U-shaped ziptie-like strip that goes over the frame and into the ratcheting sliding mount. It secures the bikes well but it is a much different solution than the long, stretchable rubber strips on older Yakima racks. If there is a fault it’s that the ZipStrips have to be completely removed from the rack in order to move the bikes whereas the rubber strips would just give. This increases the chances of them getting lost.

Once all the bikes are loaded they can be locked via an integrated cable lock. The cable is attached and hidden in the vertical mast piece. Pull the cable through all the bike frames and over the frame of the last bike – this is important as going through the frame of the last bike will allow it to be removed. Insert the cable into a receiver at the end of a load bar and your bikes are now locked to the rack.
The same key is used for the cable lock and to lock the rack to the vehicle hitch. It can be matched to other Yakima racks and cargo boxes, which is very handy. I think having the integrated lock is a traffic feature. My old bike rack does not have it and I had to use a combination of U-locks and cables to secure my bikes. Then I used a hitch lock to secure the lock to the vehicle. This is was a complete pain in the ass but I do believe that it saved my bikes from being stolen at least once.

On the road:
Once properly loaded and ZipStriped, and the rack properly locked, all bikes felt secure. I shook the rack before driving and there was some expected movement. Likewise, when driving, the whole rack with bikes occasionally swayed slightly over uneven roads. This is by design, like a tall building that moves during a windstorm.

Being obsessive, I stopped twice on our hundred mile trip to check the rack and the bikes. I checked how the bikes were attached and if they moved. I checked how the two parts of the rack were secured to each other and to the vehicle. I never found any issues. Everything seemed very well attached and secured.
Highway speeds have very little effect on the rack and the bikes. Respect that fact that you have a rack and bikes attached to the ass-end of your vehicle and take it easy in the corners. Parking lot maneuvering and tight city streets is where extra driver attention should be focused. Depending on your vehicle, rear visibility might be obstructed. Remember to disable rear back-up sensors or they will go crazy anytime you shift into reverse.


Accessing the trunk:
The whole idea behind the Yakima FullSwing is that it swings open. Whereas typical bike racks tilt down to provide hatch access, they are not designed to tilt down with bikes on the rack. The FullSwing allows the rack to be swung to the side with bikes on the rack. That is a tremendous advantage, especially on a road trip, when the rear of the vehicle is packed to the roof and you’re looking for that small item that is somewhere down there.
To swing the bikes away from the rear opening, just unlock the mast of the rack from the hitch part by spinning the large handle that you have previously tightened to 32 ft-lbs. Then pull the whole vertical assembly, with the bikes, out to the right side of the vehicle. Make sure to open the bottom hinge full 180 degrees as that’s when it locks. Locking it is important in case the vehicle isn’t parked on an even surface. Be sure to swivel the mast/load, too, so that the bikes do not hit the vehicle.

After doing your business in the trunk and closing the hatch, swinging the rack back is the reverse procedure. Unlock the hinge and swing the whole thing back into position. It may require a few attempts to properly click into place. Then once again tighten the big handle to 32 ft-lbs. Wiggle everything to make sure it’s all properly attached. Now continue on your adventure.

Daily living:

It’s best to simply remove the FullSwing when it’s not in use. Swinging this rack out of the way without the bikes on it isn’t something you want to four times a day while running errands. In the days of power tailgates, no one has the patience for the clicking and spinning of the handle. It is best to just leave the rack at home when it is not in use.
Storing the rack off the car will require some space, too. It doesn’t fold neatly, yet few of these racks do. It is large, heavy, and not very stable once off the vehicle. That is the compromise for having the ability to carry four large bikes and also to be able to access the trunk with the bikes on the rack.

The weight:
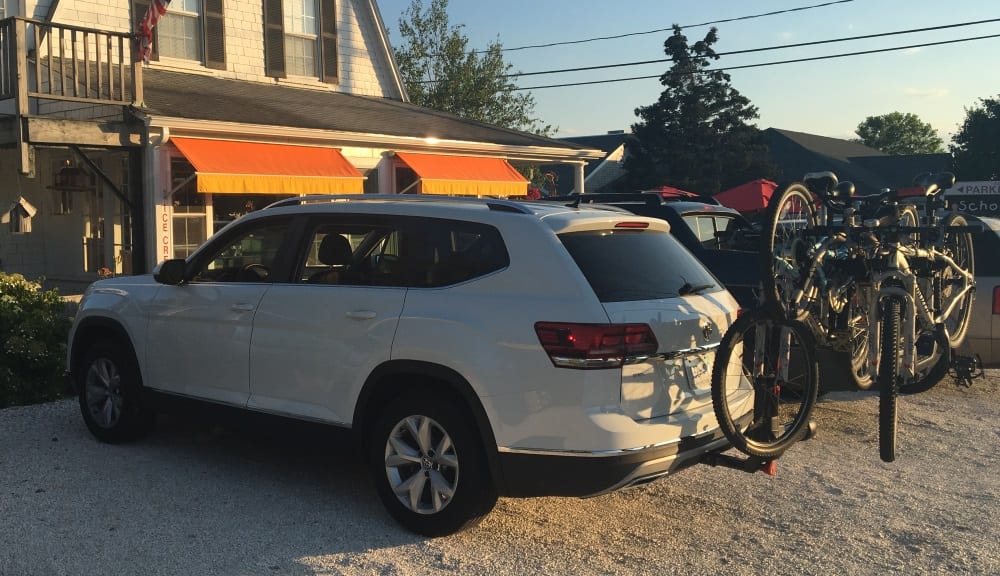
The rack is designed for a 2” receiver, which means it’s class III or higher. Simply put, the FullSwing is designed for bigger vehicles, likely a three-row SUV or a half-ton pickup, capable of towing more than 3,500lbs, such as the pictured 2018 Volkswagen Atlas V6.
But towing capacity is not directly applicable to bike racks – tongue weight is. Tongue weight is the amount of weight that a trailer hitch can support. Typically is it 10% of maximum trailer weight. For class III hitches that is at least 300 pounds and as much as 600 pounds. Yakima says that the FullSwing can support four forty-pound bikes. The rack itself weights 56 pounds. That puts the maximum weight of this rack with bikes at 216 pounds. That is well within limits for a class III hitch.


Conclusion:
Transporting four large bicycles is not easy but the Yakima FullSwing makes it much easier. With it, your bikes will get to the destination safely and securely. Its biggest asset is the ability to access the hatch with bikes on the rack. That access isn’t ideal but it beats hoping over the rear seats. The Yakima FullSwing retails for $499.

[Disclaimer: Yakima Products Inc. provided the FullSwing bike rack for the purpose of this review. All images copyright Kamil Kaluski/Hooniverse 2017. Video: Yakima 2017]
Leave a Reply