
It really bothered me. Every time I opened the hood of my project Integra, there it was, staring me in the face – the aged and faded valve cover. I decided to do something about it. As you can judge from the above picture, the result is pretty good. It’s actually much better than I anticipated. Hit the jump for the step-by-step of how I did it.
 First, take some brake fluid and clean that mofo. Oil is the enemy of paint. Brake cleaner is the enemy of… well, everything. Brake cleaner is BFF with carb cleaner, my other fav cleaner, but don’t use that.
  Spray, wipe, spray, let it drip, spray some more. Brake cleaner is cheap.
  Use compressed air to dry the valve cover. Notice that much of the old paint has come off all by itself just by cleaning it.
  The paint that hasn’t come off, which is most of it, has to be physically removed. You can sand or carefully grind it off with a soft-ish wheel. Sorry, I don’t know the specifics of the wheel used here.
  Keep going. Remove as much of that paint as possible, preferably all. It’s important to remember, however, that this is a part of the engine on an old car and in my opinion does not need to be perfect, but it does need to look better. If it’s perfection you’re after, send your part for sand blasting and powder coating.
  Almost there. Getting to the hard to reach places with a grinder or ever sandpaper is…, well, hard. I didn’t sweat them because I wasn’t going for perfection, that paint was quite solid, and the valley in the valve cover where the spark plugs are is covered up anyway.
Now clean that biatch one more time. How you prep the painting surface often matters more than how you paint it.

Now, prep for paint some more. Here I placed the valve cover on some paint mixing sticks as opposed to a flat, possibly kind of dirty, surface. Elevating it will prevent it from sticking to the surface and possibly screwing up the edges. Also, cover up any threads and other parts you don’t want paint on. I used caps from WD40 spray cans which happened to perfectly fit into the spark plug openings. I didn’t cover up the letters, which I didn’t want painted, because I was afraid that removing the the tape later might mess up the paint around it. Instead, I removed the paint, as you will later see.
At this point Mr. Emslie suggested further cleaning with paint thinner or acetone should have been done, but I didn’t do that. 
Primer! There are some many DIYs on the internet about valve cover re-painting and so many of them forget this very important step. The paint will adhere better and last longer if you use a primer. Some will say that the primer paint won’t stand up to heat well, but I’ll take my chances. Make sure to shake the can well and put on a nice and even coat. Let dry for fifteen minutes.

Start painting!! Once again, nice and even strokes. As with painting everything, multiple thin layers are best. I chose a black high temp VHT paint with flat crinkle finish. This should make the valve cover looks like it did when the car was new. Please note that I resisted to paint the valve cover red, as in on the Integra Type R.
 It looks shiny in between coats.
  With the paint still wet, I took a razor and carefully scrapped the paint off the letters that I did not want painted. In hindsight, I should have removed the primer paint before paining it black. And yes, I did screw up as you’ll see soon.
  Use a clean cloth to removed the scraped paint.
  One, freshly painted, Honda B18C valve cover. It’s best to let it dry in a clean, warm, place overnight, before handling. Some people say to put it into 200F oven for 10 minutes or so, to allow the paint to harden, but I believe that will happen by itself after the engine runs for more than ten minutes. Notice that I accidentally “cut” a little hole between the O and the H with the razor. That is really bothering me and I haven’t figured out a way to fix it yet.
  How it looked the next morning. The wet looking paint turned into a pretty crinkly finish.
  Here is an awkward picture of it on the engine, sans spark plug cover. While installing it I touched it front and center with my oily hands. I am hoping that this oil will come off with some soap and water. Maybe? Also, now that the valve cover is clean and pretty, the rest of the engine looks more dirty. Ugh.
Project Integra – Valve Cover Refinish
About
-
Some -single- people say to put it into 200F oven for 10 minutes or so…
Edit- I’ve used aircraft remover to clean paint off parts. That’s some serious sh-t there. Use many layers of gloves.-
Aircraft remover works great on paint but it can be a bit harsh and tends to pit some surfaces.
https://upload.wikimedia.org/wikipedia/commons/thumb/d/dc/3.7_Inch_Anti-Aircraft_Gun,_Nothe_Fort,_Weymouth.jpg/716px-3.7_Inch_Anti-Aircraft_Gun,_Nothe_Fort,_Weymouth.jpg-
Which is why it is often referred to as:
http://4.bp.blogspot.com/_LbEOZqOqjYs/TKnSHv9GOxI/AAAAAAAARxE/20jlkKVSW-c/s400/ack.jpg X2 -
Can be a little expensive to run, and like many older methods may run up against current environmental protection legislation.
-
-
-
That’s the problem with a “simple” little project – it always looks great and magnifies how awful everything else looks. Now you need new hoses, and new plug wires, and soon you’ve got the entire car disassembled and stashed in various boxes and your wife upset because her car no longer fits in the garage and soon she’s questioning the whole marriage and now you need to find an apartment with a storage shed for your boxes of car parts and then have to sell your parts to afford the attorney fees…
-
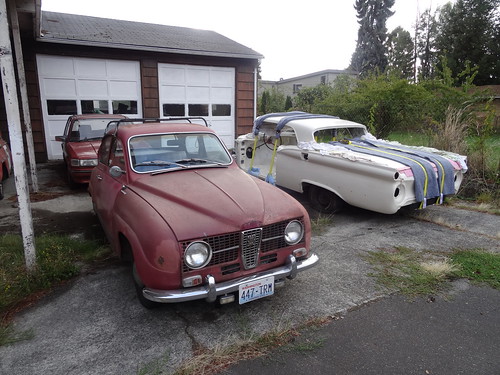
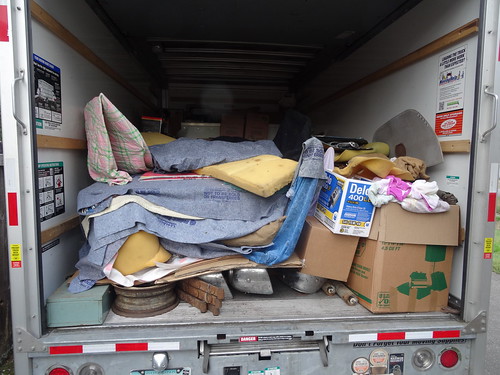
Hey, I know I’ve been quiet the last few days but I just got back from Oregon where I picked up my disassembled ’59 Skyliner from my father’s place and brought it home. I need to rearrange some stuff in the garage before I can park it there, so the loose pieces will have to go into the house temporarily and… Oh.
https://farm1.staticflickr.com/759/21431161322_5f83f02921.jpg
https://farm6.staticflickr.com/5617/21442131065_ae55856d4a.jpg-
Solid plan.
-
I have to tell you how much I love that image with Skyliner, Saab and, er, Maestro on a decidedly non-European driveway.
-
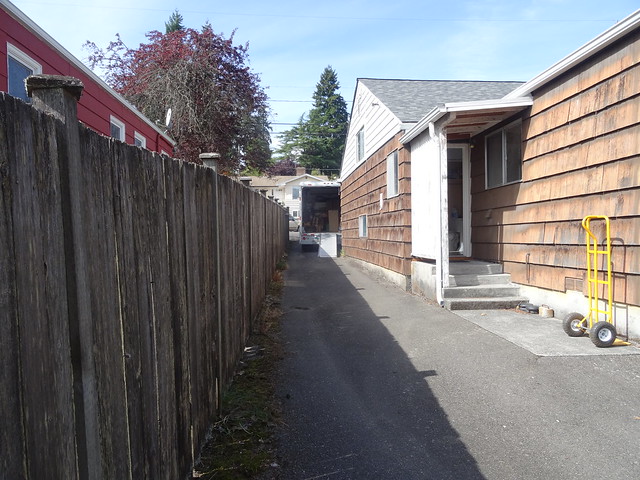
Thanks! You’ve just inspired me to stop and take a photo in the other direction:
https://farm6.staticflickr.com/5643/20823528894_a801a7a6a3_z.jpg
I’ve made headway in unloading the truck, although I admit it would go faster if I had a shorter or wider driveway.
https://farm6.staticflickr.com/5809/21446145135_72921723a9_z.jpg-
So amazing. Just think, people slightly more normal than you would just be spending all this time and money on a shrink… and here you are. Winning.
-
I doubt a shrink could tell me much that I haven’t already ignored from others or from myself. Besides, some of my LeMons teammates have assured me I’m perfectly fine.
-
-
I just hope that, 25 years from now when you finish restoring the Skyliner, you don’t find that with the added trim and door handles it is now slightly wider than the driveway…
-
I considered that before we made an offer on the house. The narrowest point is 7’3″.
-
-
-
-
Hmmm, Temporarily means ‘not INTENDING to do this forever’ ?
-
Practically no time at all, speaking as a geologist.
-
I’m smart-ish, and I have been paying others to do most of the work, because of that very reason.
-
I, on the other hand, am just not that smart-ish.
-
I’ve been on both ends. Usually, the smart mechanic will tell you he needs to outsmart your former mechanic, thus redoing unsmart work that has already been done. If you’ve been through that a couple of times, you smarten off it and try yourself again. Smart.
-
Smart is over-rated anyway. I’m quite happy to settle for ‘scruffy’.
-
So true, so true….. SparkPlug wires are a gateway repair….to Hell
Leave your “cut” mark. It’s a character mark. Like a mole on a supermodel. It also looks like an apostrophe so your valve cover now says, “DO’H C”. Rename your car “Homer” and move on.
-
I like that.
Get a model paintbrush, spray a bunch of your crinkle paint into a little plastic bowl, use brush to apply very gently to apostrophe in a couple of coats. GTG.
-
I can vouch that this works- at least on Italian aluminium.
Paint ‘cher rockah covah!
-
What a hack job!
I do adore that crinkle finish paint. Almost as much as hammer-finish.
I sure hope that your primer was high temp. If not, the primer may fail, and lift the rest of that lovely job.
For that little divot, you might just dab it with a Sharpie and proceed. Otherwise, the suggestion to brush paint in a bit of the spray is an excellent idea.
I hope that you did also paint the spark plug valance at the same time. And a new set of wires and plugs is most certainly in order at this glorious moment.
-
Hammer finish is when you find out you cut that ONE little spot, and there happens to be a hammer nearby, right? http://media-cache-ec0.pinimg.com/736x/b4/26/3f/b4263f0e0e6d178b3a973adbbbc2193f.jpg
-
Yeah, loosely.
-
-
I think your primer will be fine, a valve cover only gets up to about 110 C which is within normal operating parameters.(dark paint on anything in sunlight). And the top coat will protect from solvent attack.
-
No, but I cleaned it well. Again, wasn’t going for perfection, just improvement.
Leave a Reply